Monday, March 25, 2013

March Blog Hop at PTI - Sequins

Papertrey Ink is hosting their March Blog Hop today and it is all about sequins. I have to admit I have not used sequins on my cards, but was able to scrounge some up out of my stash - have no idea where they came from. This card was quick and fun to make, love how it turned out.


I put a bitty sparkle in the center of each sequin and used a strip of glossy blue paper that I cut from an old greeting card. The green DP also has a shine which is a lot more shine than I usually use.

Supplies - Card is A2 size
Paper - DP - Miss Nelly (Kaiserkraft), textured White Daisy CS (CTMH), blue glossy (old greeting card)
Stamp - Botanical Silhouettes Vol 5 (PTI)
Ink - Memento Tuxedo Black
Accessories - sequins (stash), bitty sparkles (CTMH)
Other - Corner rounder

Sunday, March 24, 2013

Hello Spring!

This card tried really hard to be a single layer card, but I just couldn't leave it alone and ended up adding a couple of layers. I have admired the CAS cards at the Less is More Challenge blog and have wanted to participate in one of their challenges. Last week their challenge was 'Frame It' , which inspired the creation of this card, however I didn't make the challenge deadline. Flourishes 'Timeless Tuesday' challenge this week is 'Bring On Spring' and the Play Date Cafe colour challenge is 'Welcome Spring!'. Love the colours!

My starting point for this 'spring' card was the beautiful Hydrangea stamp set from Flourishes. The stores are full of brightly coloured spring flowers right now including multi-hued hydrangea plants. Love them!


Supplies - Card size is A2
Paper - Black, Lagoon CS (CTMH), Neena Solar White
Stamps - Hydrangea, Butterfly Blossoms, Tag Lines (Flourishes)
Ink - Memento Tuxedo Black, Copics - YG11, 13, 17, BG10, 13, 15, V000, 15, 17, .1 multiliner
Accessories - blue sparkle (CTMH)

Thursday, March 21, 2013

Splash of Hot Pink - ric#32

I've been really drawn to clean, graphic cards lately. I love clean and simple cards, but seem to have a difficult time with them. You would think that they would be easy to produce, but for me apparently not. So here is my latest attempt and my first try at a 'Runway Inspired Challenge' - ric#32 - love their inspiration photos. This week's photo said black, grey, hot pink satin and linear (tubing in background) to me.


This is what I came up with. The glitter gems at the top are a hot pink that matches the satin ribbon, but I had a hard time getting the colours right with my camera today.


Supplies - Card is a standard A2 size
Paper - Black, grey, white CS (Bazzill)
Stamp - Botanical Silhouettes - Vol 5 (PTI)
Ink - Versa Mark, White EP (CTMH)
Accessories - Hot Pink 1" satin Ribbon (Fabricland), Hot Pink Glitter gems (CTMH), black twine

Thursday, March 14, 2013

Graphic Green Birthday Card

I saw this great sketch on Nicole Heady's blog last month and knew I just had to try it. I love the clean graphic lines. At first glance it looks relatively simple but it isn't as straight forward as it looks. After checking out some of the challenge submissions on Nicole's blog I found that others had some difficulties as well, so I have included a picture tutorial below for the way that I tackled the angles on this card.

I am entering this card in Flourishes' Timeless Tuesday - 'Go Green' challenge and the Heart2Heart 'Go Green' challenge.


Nicole's sketch
Tutorial:

1) Cut 3 pieces of paper 1/2" wide x 12" long and glue onto a sheet of copy paper (or cardstock), squaring them up along the long edge making sure to apply glue to the entire back of each piece.


2) Trim the excess paper from the strip as shown below. Cut a card base 4 1/4" h x 5 1/2" w with the fold at the top. Draw a light pencil line 1 1/2" from the left edge of the card base in the lower half of the card. (I did this on a scrap so that I could make the line darker and write the dimensions for you).


 3) Lay your pattern strip onto the card base as shown below, lining the top edge with the top right corner of the card base and the left edge of the pattern strip so that the bottom left corner of the strip touches the bottom of the card base at the point where your pencil line meets the bottom edge. Mark your strip with pencil marks at all points shown in picture below. Using your paper trimmer or a ruler and kraft knife, trim the strip at each end using the pencil marks as a guide.


4) You will now have two pieces of your pattern strip as pictured below. The piece on the right is the piece you cut above and the piece pictured on the left is what was left over. Line the pieces up as seen below and then flip the left piece on top of the right, right sides facing each other.


5) Holding the two pieces together, flip them over and use the top piece as a template to cut the angle for the other piece (make sure to keep the long edges aligned).


6) Adhere both pieces to your card and trim the left strip matching the angles at your pencil mark. Erase any pencil marks showing.


Supplies: Card size is 4 1/4" x 5 1/2" (All supplies CTMH except where noted)
Paper - For Always, White Daisy, Pear, Black CS
Stamp - Perfect Fit Birthday, Card Chatter Birthday (for inside)
Ink - Pear
Accessories - Black Waxy Flax, black buttons (fabric store)
Other - 1 1/4" punch, Std Circles Lg (Spellbinders)


Wednesday, March 13, 2013

Cardstock Chevrons

Hello everyone. I have a clean and simple card today using only cardstock and the chevron technique that I posted a picture tutorial for here. This is release week at Flourishes, so I am entering this card in their Colorful Creations Challenge for a chance to win the March release. I am also entering this card in retro sketches #54 challenge.


**** Just a note about creating this pattern. When using strips of varying widths be sure to vary the inset when you are creating your strip stack. For this pattern above the lt. and dk. blue strips are 1/4" wide and the white and yellow strips are 1/8". As you lay each strip down you should inset it by the width of the strip below it. So here my yellow strip was inset 1/4" (the width of the dk blue strip below it) and the lt. blue strip was inset by 1/8" (the width of the yellow strip below it) and so on. Please refer to my picture tutorial, the link is above.

 Supplies: Card is standard A2 size
Paper - Yellow, Dk and Lt Blue CS (Bazzill), textured and plain White Daisy CS (CTMH)
Stamps - Hello Baby (Flourishes)
Ink - Outdoor Denim (CTMH)
Accessories - Bakers Twine, Epoxy Bubbles (CTMH)
Other - Lg & Sm Classic Circles (Spellbinders), 3D foam


Friday, March 1, 2013

Crazy For Chevrons

Chevrons seem to be pretty popular in the paper crafting world these days. I have been having fun creating my own chevron patterns using paper scraps. Here is a card that I made and below you will find a picture tutorial showing you the method I used. Again, this is a method from the quilting world (it's been years since I have done any quilting) and you will find that the possibilities are limitless.


I used this weeks Freshly Made Sketch #75


Supplies - Card is standare A2 size - All products are CTMH except where noted
Paper - Chantilly, For Always, White Daisy & Buttercup CS, Black CS (unknown)
Stamp - Thank You
Ink - Black
Accessories - Black Button (stash), Black Hemp

Chevron Pattern Tutorial:

1) The first thing you need to do is select the papers you want to use. For the card above I used five different papers and for this tutorial I used only three. You can make each paper different or use as few as two. I lay them out to see what looks good together, what effect I want and what order I want to place them in.

In the photo below you will see the strips that I have cut for this pattern. I used a green print, a pink print and a white cardstock. I cut eight of each at 1/4" x 5 1/2" (total of 24 strips) - this gives a finished trim piece of 6 1/4" wide x 4" high (5 1/4" high if you don't trim off the points). If you wanted to use more than three prints then you would adjust the numbers accordingly. You can cut your strips longer, which will give you more chevrons or you can cut more strips which will make your chevrons longer)


2) Now you will adhere these strips to a piece of cardstock (I use a lightweight inexpensive cardstock). I used a two way bonding adhesive, you can use whatever works for you just keep in mind that you need to cover the entire back side of each strip since you will be cutting the strips later. Start gluing down the first strip to the bottom left corner of the cardstock lining up the edges with the bottom and side of the cardstock. Continue gluing down your strips in the order of your pattern making sure that you offset each piece to the right by a 1/4" (if your strips were 1/2" wide which would probably be good for scrapbook pages the offset would be 1/2"). For this pattern I used 4 of each of my three colours.


3) Now rotate your cardstock piece 180 degrees and start gluing the rest of your strips to the bottom right hand corner making sure you offset 1/4" to the left and add the strips in the same order as the first.


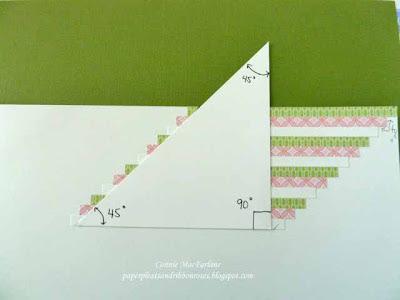
4) The next step requires trimming your pieces at a 45 degree angle. Remember back if you will to high school math class (this goes quite a way back for me) and those little math sets with the plastic and metal bits. For the life of me I couldn't remember what any of the pieces were called and had to look it up. If you happen to have the plastic right angled triangle piece you can use that (it's actually called a 45 degree set square) or you can make your own. Take a square of cardstock (mine happened to be 5 1/2" x 5 1/2") and cut it exactly in half on a diagonal to give you two right angled triangles as pictured below.


5) Using the triangle you just created you will trim your pieces at a 45 degree angle as shown below. Line up the bottom of the triangle with the bottom of your stacked strips lining up the long side of the triangle with the offset edge moving it over so that you can see all of the corners (this is hard to explain please see the photo below). Make a pencil mark at the top and bottom. Turn paper 180 degrees and repeat on other side. These marks will be used as a guide to trim the piece.


6) Cut the cardstock close to the top strip of your first stacked strip, then using your paper trimmer and the pencil marks as guides trim as shown below. Trim off any excess cardstock.


7) Repeat steps 5 and 6 for the other stacked strip.


8) Now you will cut the above pieces into strips. These can be cut to any width. For my yellow/black card above I cut them 1/2" wide, which worked out really well since I have a full line down my trimmer that I could use as a guide since you can't butt these pieces up to the top of your trimmer. Since I wanted to cut the pink/green pieces at 5/8" wide I created a guide line by adhering a strip of cardstock to my trimmer with glue dots at the 5/8" mark. (you may be tempted to simply measure off and mark 5/8" at the top and bottom of your pieces, but believe me this will not work)


9) Now you can glue these down directly to your project or if you are making a trim piece glue them to a piece of copy paper and trim to the desired size. (I glue them to copy paper rather than cardstock so the finished piece won't get too thick). Below is my finished pattern - I haven't glued it down yet since I haven't decided what I will do with it yet. You can also just add a single chevron to your project.


I hope these instructions made sense. Have fun!